I can’t stress enough how important it is to backup your device. Working in the wireless industry for years, I have seen too many instances where someone’s phone has died and nothing was backed up. Everything was gone. This is such a preventative measure and I am here to help.
First things first, pictures. I think photos are most peoples number one worry. I cant tell you how many times I had to tell someone all of their photos were gone. It is not a good feeling. I have also gotten to play hero and tell someone that their phone backed up one last time before it died. I am going to tell you a couple of different ways to backup your photos along with other files that mean the most to you.
Google Photos
Some people do not trust Google. If that is you, skip to the next section. The biggest thing I can tell you is to not put anything on the internet that you don’t want anyone to see. Google Photos is an app that I heavily rely on. It is an app that backs up your photos for FREE. So much of my life is out there on the web, Facebook and Google, that it doesn’t bother me too much. Some people are worried that Goolge will have access to all of their photos.

This app is as simple as opening the app and letting it sync. For this app, along with the others, to sync, the app will have to remain open. Now, no matter if you are on iPhone, Android or even a computer, your photos are accessible. If your phone crashes tomorrow, your photos are on Google Photos, available to retrieve.
If you do not have a Gmail account, the app will make you create one before proceeding. This is a very simple process that takes no longer than five minutes.
iTunes
iTunes is the trusted and true way to backup your iOS devices. The first thing that you need to do is download iTunes onto your computer..
After the download of iTunes is complete, you will go through a setup process. Following that, you will use the cable, that came with your device, to plug into your computer. At that point, you will click on the icon that looks like an iPhone. After that, on the left hand pane, click Summary. At this screen, click on the option to backup to This Computer. The last step is a personal decision and that is to encrypt your backup or not. If you check the box to encrypt it will ask to create another password. The encrypted backup stores all of your passwords and health data. This password that it is asking for you to create is to protect that backup from anyone except for yourself. At this point, click Done. iTunes will now start a backup.
If you have never backed up your iPhone, this can take anywhere from 15-30 minutes or even up to an hour, depending on how much content is on your device. Whatever you do, do not unplug your device from your computer the middle of backing up.
The benefit of backing up to iTunes is that it is the fastest way. Because it is connected by a cable, the data transfers to a computer a lot quicker than options over a wifi network.
Once the backup is complete, you are golden. There is nothing else you have to do. I would make it a habit to backup your devices, at least, once a week. One thing that I have found helpful is to set a reminder in your phone, using Siri. “Hey Siri, remind me to backup my phone every Friday”.
iCloud
For this iCloud backup to work, the first thing you need to do is to go to Settings>then click on the very first option where it says your name.
Click on iCloud and scroll down to where it says iCloud Backup. If it is not on, turn it on. Beware, Apple is very stingy with its iCloud storage options. They only give you 5 GB of free iCloud storage. More than likely, if you have more than 5 GB on your device, you are going to need to upgrade your iCloud storage.
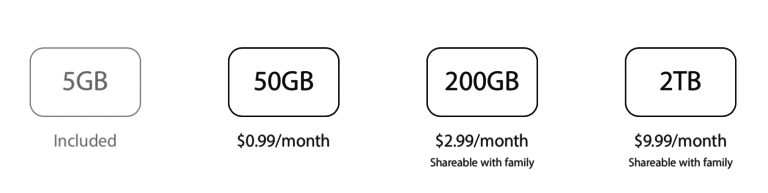
Remember, this storage is “cloud” storage not actual storage that will let you take more pictures or put more content on your device. For example, if you have used 70 GB of your 128 GB iPhone and have purchased the 50 GB plan, you will keep getting that annoying message that your iPhone cannot backup to iCloud because you are out of storage. If you want your phone to continue backing up, you will need to shell out some more money for that 200GB plan.
Once you iCloud is turned on, you do not need to do anything further. Overnight, as long as your phone is connected to wifi and charging, your device will backup.
Another helpful tip is to manually backup your phone to iCloud. To do this, go to Settings > Click your name > iCloud > iCloud Backup > Back Up Now. This will force your phone to do a backup. This is helpful if you are about to update your software or if you are about to get a new iPhone and want it to restore to the up-to-the-second spot you left off on your old device.
Family Sharing
Apple recently introduced Family Sharing. Family Sharing is a way for families to share content across devices such as iBooks, music movies and apps. This allows up to six Apple ID’s to join in on the sharing.
Previously, people would all log in under one Apple ID and it would be a train wreck. Everyone would end up getting everyone else’s iMessages and their iTunes libraries would be a jumbled mess. This alleviates that issue.
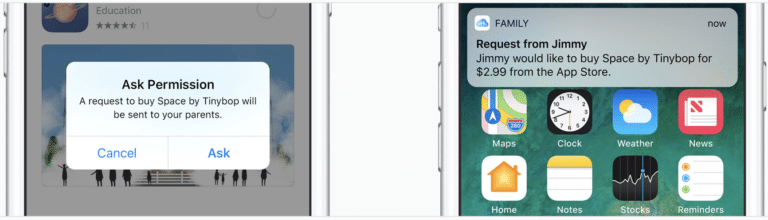
This is also great for parents who want to keep a closer eye on what their kids are downloading. You, as the “parent” can give permission when the kid requests to download an app, game, music, movie or book.
One last thing to touch on about Family Sharing, Apple Music. Apple Music for an individual costs $9.99/month. If you sign up for the Apple Music family plan, it is $14.99/month and allows those same six Apple ID to have access to unlimited music streaming and downloading.
Dropbox

The next service I want to tell you about is Dropbox. Dropbox has been around for years so you can depend on its security and reliability. Dropbox can hold files such as pictures, music, videos and documents. For free you get Dropbox’s Basic plan which includes 2 GB of storage. For $9.99/month or $99/year, you can get their 1 TB (1,000 GB) plan or for $19.99/month or $199/year you get additional business support and options.
Google Drive
If you’re looking to backup files other than photos and videos, Google Drive is probably your best bet as far as what you get for free. With a free Gmail account, you get up to 15 GB of free storage. For $1.99/month you get 100 GB of storage, $9.99/month for 1 TB and $99/month for 100 TB.

I like Google Drive a lot because I didn’t have to create a new account since I already had a Gmail account. Also, I use Google Docs for a lot of my file creations and it integrates very nicely with that. Like Apple, Google has a very well integrated platform that works well together.
Amazon Drive

If you are an Amazon Prime member, Amazon Drive is another great backup. You get unlimited photo storage if you are a Prime member and 5 GB of other storage as such as videos, music and documents. You can get 100 GB of storage for $11.99/year which is a really great deal. Like a lot of these other apps, all you have to do is give the app access to automatically upload photos when the app detects new pictures.
Now, Go Back Up Your iPhone!
With all of these options, you have no reason not to be backing up your phone. I know this is something we always put off, but take the time to do it. As much as we depend on our devices and how much we pay for them, you’d think they would be perfect. Unfortunately, they are not. The reality of it all is that your phone will die on you at the worst possible time and you are going to wish you had all of those photos.
Please share this with your friends and family. If you are your family’s go to tech person, save them (and especially yourself) the headache and set them up with the backup option that works best for you.
This is not a comprehensive list so we would love to hear how you backup your device and if you have any other best practices!
Follow us on twitter @iphoneteam