We love our iPhone and we can’t imagine life without it. While some of us are new to iOS, most of us have had many different iPhones over the years. We think we know the smartest, most efficient way to use our iPhone…but do we really? A quick iPhoneteam survey reveals how a vast majority of you (85%) are still typing out your text messages on the keyboard. As we all know (especially those of us with larger thumbs), many mistakes are made when typing on the tiny keyboard. There is a better, faster way to text and to use your iPhone better and smarter than you do now.
Here are 8 Tips to Use Your iPhone Better
1. Location Based Reminders and Time Based Reminders via Siri

We all lead busy lives and we are constantly on the move. It’s no wonder that we often forget to do something given a specific time or location. For example, I am often asked to pick up something from the store on my way home from work. How would you handle this request? Would you write it down on a tiny sticky note? Would you put an “X” on your hand (yes, I used to do this)? Do you simply try and remember…and sometimes forget?
Using Siri Location Based Reminders: “Hey Siri, Remind me to pick up the milk and cookies when I leave the office.” The last part that is underlined tells the Reminders app to alert you when you exit a certain location. When you get in your car and drive a little ways from the office, the alert will pop-up. Another great example of this is to set an alert when you arrive home like “Hey Siri, remind me to write the check for the mortgage, when I get home.”
Using Siri Time Based Reminders: Some people get in the car and put their phones away (though I’m not sure why). So for the first example above, let’s say you always leave work at 5:30p. Then you could set a time reminder saying, “Hey Siri, remind me to pick up the milk and cookies at 5:29 PM.” I use time based reminders all the time to remember to pick up my kid at school at a certain time. It’s not that I’d forget to pick her up, it’s just that I may get immersed in something at work and lose track of time so this is a quick and simple reminder.
Side note: If your iPhone does not yet recognize your “home”, “school”, or “office” address, it may ask you to set those up with a simple step-by-step process.
2. Voice to Text Dictation
85% of iPhone users still primarily type to send text messages. Now we get that sometimes other people are around and you want the contents to be private. That aside, way more of us should be using voice to text or simply audio texts in iMessage. If you have never used dictation on your iPhone, you are missing out. This is one of the biggest time savers and conveniences of an iPhone. Say you only have one hand to text and it is extremely difficult for you to text with one hand. You can pull up your message and tap the tiny microphone that is to the left of your spacebar.

This will bring up a Siri-like interaction instead of the keyboard.

From there, just speak out loud what you want to say to whoever you are messaging. You do need to speak your punctuation. For example, “Do you want to go to the game tonight question mark” would come out to be “Do you want to go to the game tonight?”. After that, you just press done and hit send. Voice to text dictation is especially good for longer text messages. Once you use this, you will wonder why you haven’t been doing so for years.
It is very straight-forward and easy to use.
Side note: If you do not see a microphone icon beside your keyboard, go to Settings > General > Keyboard >Enable Dictation – Switch on.
3. Text Replacement/Shortcuts
If you are guilty of typing out a long phrase over and over that can get annoying. Let’s imagine you work for a school, West Mountain Community College. That would get old quick, typing that out day after day. So let’s make this simpler and make a shortcut for it.
Go to Settings > General > Keyboard > Text Replacement
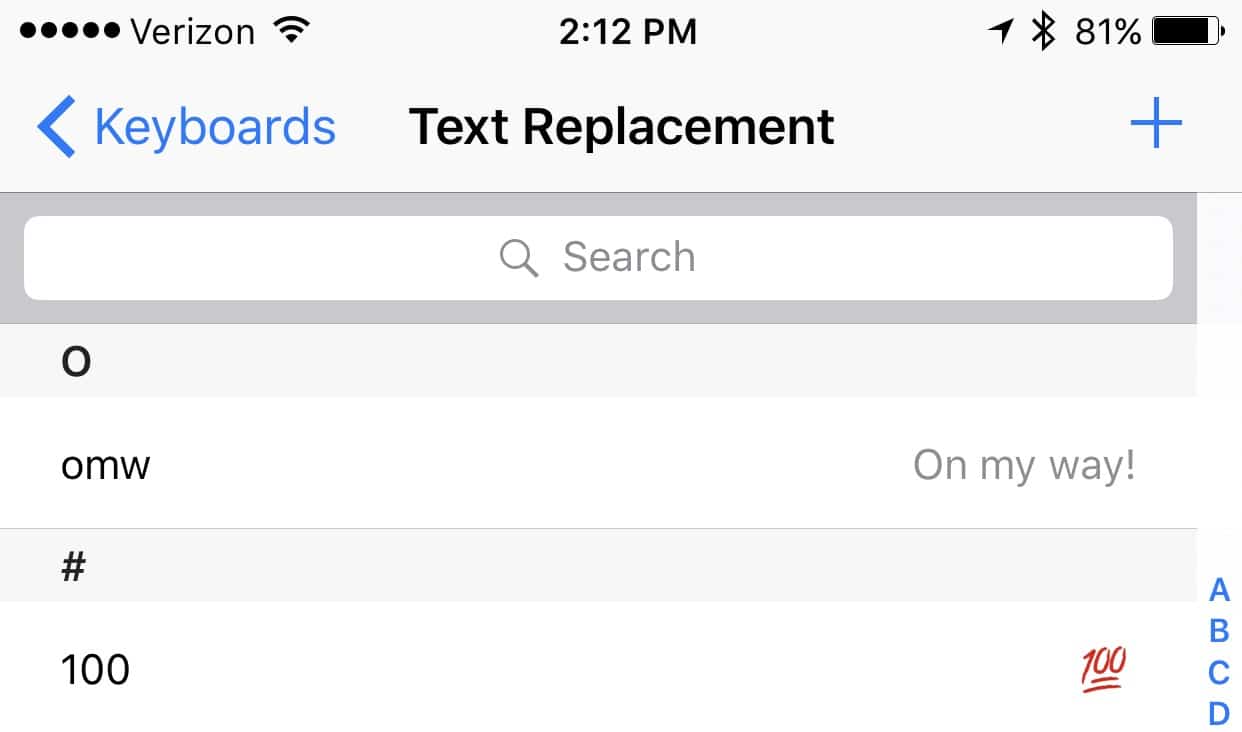
Next, click the + symbol at the top right of the screen.
Now we will type in what we want the phrase to be. In this example, we will use the prestigious West Mountain Community College.
Below that we type in what we want the shortcut to be. We will type in wmcc. Then click Save at the top right.
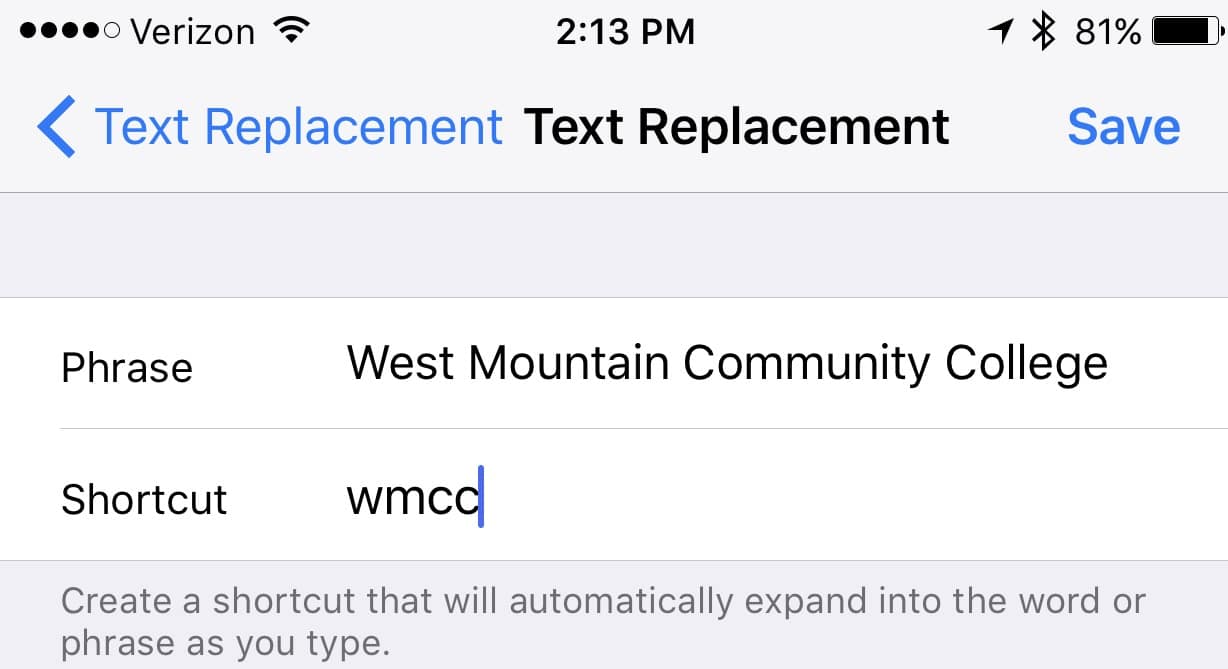
Now, every time you type wmcc, it will change it to West Mountain Community College. Fairly convenient, huh? Think of all the phrases you type in regularly like your address so someone can get to your house. Never again.
Bonus Tip for Businesses: Are you on the road a lot and have to field similar questions over and over? Maybe your handle a lead form email or you are in support and you have often explain the same thing over and over. You can create a multi-paragraph phrase and create a simple shortcut then tweak and personalize as necessary.
4. Quick Camera Access
So we all have that one friend, family member (looking at you Mom) or maybe it is you, who pulls out their phone, enters their passcode, locates the camera app then takes a picture. That works. I get it, that’s how we did it for years. Well, I am here to tell you, Apple makes this so much easier so that you don’t miss that perfect photo opportunity.
From the lock screen, did you know you can simply swipe left (I know all you Tinder junkies know about this) and BOOM you are in your camera? Yes, that is a thing.
Also, if you are on your lock screen or even if the phone is unlocked, you can swipe up from the bottom of the phone to pull up Control Center. From there, you have a camera icon at the bottom right. I know more people know this one but the swipe left is mind blowing:)

5. Do Not Disturb
I can’t tell you how many times I wake up in the middle of the night from a notification that I truly do not care about at 2:35 a.m. It is my own fault. If you are not using Do Not Disturb, you should be.
Let’s go into Settings > Do Not Disturb.

From here we can enable Do Not Disturb. What this will do is silence all notifications while your phone is locked or always if you choose that option. Your notifications will still come through to your device, you will just not hear a ringtone or get a vibration.
I know what you are thinking, what if you are worried about missing a call from your significant other while they are away on a trip in case of an emergency. Within the Do Not Disturb settings you can go down to Allow Calls From and choose who you want to be alerted when calling.
Also, the scheduled setting is excellent. If you go to bed and wake up around the same time every day, simply turn Do Not Disturb on from bedtime to whatever time you wake up.
Once your settings are set how you want them to be, you can now turn it on quickly by swiping up from the bottom of your screen and clicking the crescent moon icon from Control Center.
Side note: If you have not been receiving notifications and don’t know why check to see if you have that crescent moon icon at the top of your screen. This inadvertently gets turned on a lot. Switch it off by swiping up from the bottom of the screen and clicking that crescent moon icon.
6. Quickly Select Photos
If you let your kids play with your phone and especially the camera, I am sure you have hundreds of photos of the ground, feet, nostrils and who knows what else. Or if you yourself just like to take tons of pictures to capture the perfect moment this is for you.
Go into your Photos app on your iPhone. Click on your favorite album. Now, click Select at the top right. From here, you can simply tap a photo and lightly drag your finger any direction to select more. This is very handy if you want to do a massive delete or select multiple photos to send to some friends.
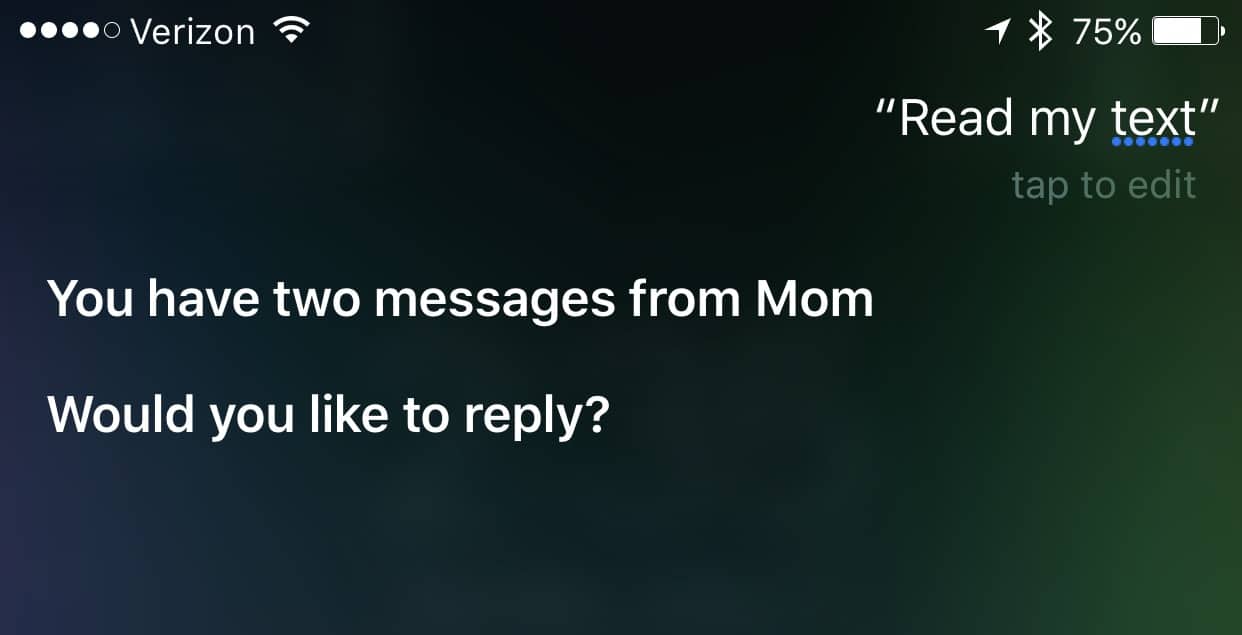
7. Have Siri Read Your Texts to You
If you aren’t in a position to read your unread texts you can summon Siri to do it for you. Simply say, “Hey Siri “Read my texts”. Siri will then ask if you want your messages read to you. This is a nice little trick and gives you a whole new outlook on “hands-free”.
8. Low Power Mode
We all have been there, your iPhone battery is getting close to 20% and you didn’t bring your charger. Or you totally forgot to charge it the night before.
Thankfully, there is a battery saving feature called Low Power Mode. When your phone reaches 20% you will get a notification asking if you want to turn Low Power Mode on. You can also go into Settings > Battery to turn this on.
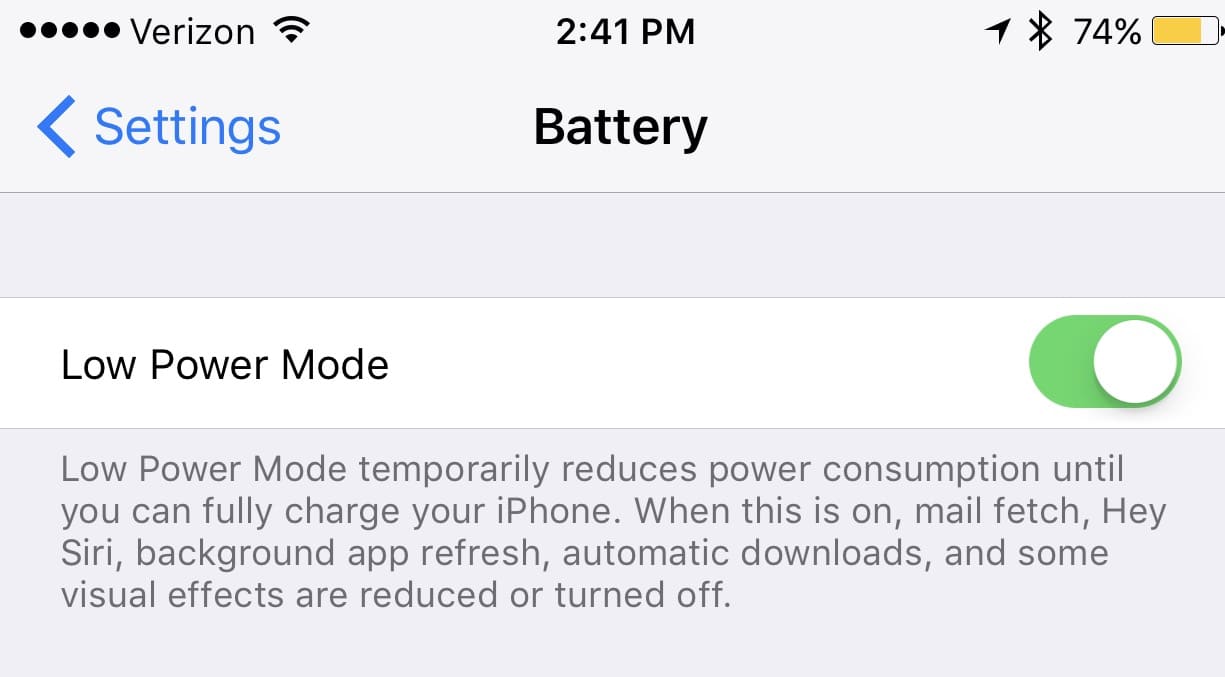
Low Power Mode will limit animations, the amount of time your email looks for new mail, location based services, auto-lock shut time, background refresh rate and many other small things to help you get the most out of your battery. Overall, it is just a beneficial tool to have at your fingertips. An even faster way to activate low power mode is through Siri. “Hey Siri, Low Power Mode On”.
There you have it, a couple of tips that will let you use your iPhone a bit more efficiently. If you learned something new or have a favorite tip, let us know in the comments below or on twitter @iphoneteam.